Posts tagged kids
Gnome Cottage Jack-O-Lantern Pumpkin Carving Idea
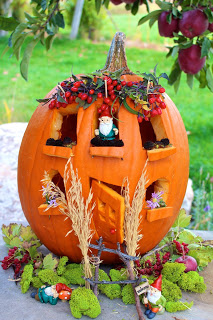
We took a break from harvesting apples in our orchard today and got creative. We decided to make a little gnome fairy cottage for our halloween pumpkin this year. It couldn't have turned out any cuter!


Directions: 
Hollow out your pumpkin as normal. Carve out windows and door. We even carved out little window in our pumpkin door. Attach door hinge using a skewer. Use the cut out windows to cut little peices into window boxes. Attach with tooth picks. Forage in your yard for berries, flowers, and grasses. Put berries across the top of the pumpkins, place the flowers in the window boxes. We used grass and tied them with a string to look like fall decor. Then We covered the bottom with moss and berries and added little gnomes for fun. 

This is the perfect non-spooky and fun jack-o-lantern and even little hands can help. The foraging as a family for the decor was the best part. Enjoy!
Easy Cake Train
Do you have some cute kiddos in your life? Well today we have an adorable (and easy!) idea for you that will keep them entertained and screen free for an entire evening. Today we are making a cake train! It couldn't be more simple. 

First, stop off at Williams & Sonoma (or hit up their website) and grab yourself a train cake pan like this one. Then bake your cake according to our directions below. Decorate with candies and frosting and you have not only a delicious cake, but an amazingly fun one too!


Ingredients: (Williams Sonoma Recipe) 

  • 2 1/4 cups all-purpose flour
  • 1 3/4 cups sugar
  • 2 tsp. baking powder
  • 3/4 tsp. baking soda
  • 1 tsp. kosher salt
  • 16 Tbs. (2 sticks) unsalted butter, melted
  • 1 cup sour cream
  • 4 eggs
  • 1 Tbs. vanilla extract


Directions:

Have all the ingredients at room temperature.

Position a rack in the lower third of an oven and preheat to 350°F. Grease and flour the wells of a railway cake pan and dust with Wondra® flour.

Sift the flour, sugar, baking powder, baking soda and salt into the bowl of an electric mixer. In a separate bowl, whisk together the melted butter, sour cream, eggs and vanilla until combined. Fit the mixer with the flat beater. Add the butter mixture to the flour mixture and beat on the lowest speed until the dry ingredients are moistened, 15 to 20 seconds. Stop the mixer and scrape down the sides of the bowl. Increase the speed to medium and beat for 30 seconds.

Divide the batter in half and set half of it aside. Spoon the remaining batter evenly among the prepared wells. Tap the pan firmly on the countertop to release any air bubbles. To ensure good details on the cakes, spread the batter so it reaches the top edges of each well and is slightly lower in the center of the well. Bake until a toothpick inserted into the center of a cake comes out clean, 18 to 22 minutes.

Transfer the pan to a wire rack and let cool for 10 minutes, then invert the cakes onto the rack and let cool for at least 1 hour before decorating or serving.

Wash and thoroughly dry the pan. Grease and flour the wells and repeat with the remaining batter. Makes 18 cakes.
Pirate Ship Birthday Cake Tutorial
Do you have a babe who loves pirates? Well we do. So when we had a birthday approach, there was no question, what type of birthday cake we would have. A pirate ship birthday cake is not just easy, its delicious too! So come on ye scury scrubs, grab a sword (or a knife) and come a long for the ride!


I recommend using Peggy's famous Nelson Cake recipe for your cake base, you can find the recipe here: http://thepurpleapple-lavender.blogspot.com/2015/01/nelson-cake_7.html 

But like the saying goes, fresh is best unless you're stressed. So if you want to use a boxed cake mix and pre whipped frosting, I won't tell anyone. I know how things can be right before a birthday party...

Directions: 
Make two 9x13 cakes. Make sure you butter your baking dishes really well so the cake slides out when it's done cooking. I found it helpful to refridgerate the cakes for at least a couple of hours before removing them from the pans. Take one of the cakes and if its facing you horizontally, slice the middle third of the cake out. Stack the remaining two edge peices on the top of the other whole cake. Take the slice you made and put stack it on one of the ends, so you essentially have one side that is 3 layers of cake wide. Then shape front of the cake to look pointed like a boat. I pushed some straws down through the cake layers to help hold them together and give them some stability. You could add frosting between the layers too. This makes it look prettier when sliced. 


Then simply frost your entire cake. I add pirouette cookies to the front to look like railings, kit kats for the doors, pretzels for the back deck railing, and chocolate malt balls as cannons. I also added some chocolate chops to the side to look like the port windows. Then I drew a skull and cross bones onto a black peices of construction paper, and used skewers to make the sails.  Then I added my sons pirate figurines and added some blue frosting along the sides to make it look like water. Adding double the amount of water your frosting recipe calls for will make the frosting actually set up and look like real water. 


There you have it mateys! This can all be acomplished during one nap time too. What's better than that! Yo ho! 

Re-Usable DIY Felt Christmas Tree for Toddlers
In continuing our series this month of easy, affordable ideas to help make Christmas magical for your kids, is this wonderful felt Christmas Tree. I apologize for the cropped out toddler, he loves this tree so much he couldn't bare to be apart for it for 2 seconds while I took a photo. I guess that is the whole point. 

There are so many great things about making a felt tree. Felt is extremely inexpensive. It's also easy to work with. Toddlers love ornaments and are constantly clawing at the real tree with real glass ornaments. So giving them their very own toddler sized Christmas tree that they can decorate over and over is so wonderful. 


Directions: Cut out a large tree shape from green felt. Then think of whatever other ornaments you would like to include and start hot gluing the layers together. Feel free to copy any of the patterns I made up here. We have a couple of gingerbread men, an elf, the 3 wise men, a polar bear, a gingerbread house, a star, traditional ball ornaments, peppermints, a penguin, a nutcracker, rudolph, baby Jesus, Santa Claus, a snowman, a candy cane, and a snowflake. You could make this all religious ornaments if you want it to be more Christ centered as well. And don't forget felt presents to go under the tree!

Your kiddos will love this tree all month long, and as a mom, you will love that nothing on this tree is breakable, and your wallet will love how inexepnsive it was to create as well. 

Happy Crafting!